Author: JGMM_BC
Subject: ouR escaPOD mods
Posted: 02 Sep 2016 at 7:45am
How do you attach it to the pod above the slide-out? Could you take a close-up picture of this area?
Thanks
Subject: ouR escaPOD mods
Posted: 02 Sep 2016 at 7:45am
| Originally posted by StephenH This is one that I just finished. I was looking at commercial slide-out covers, and decided I did not want to pay that much. Since my wife has a lot of sewing equipment, including an industrial strength Juki, I thought I would try my hand at making one. The first step was to figure out what I could use for the rail to attach it. I remembered how my parents' trailer had an awning that used a rope. I looked at what I had on hand, and after a couple of attempts, I found some that was of a good quality and the correct diameter to slide into the rail.The next step was to find some suitable fabric. We have a store called "Mill Outlet Village" near us. I found some urethane coated rip-stop fabric that seemed heavy-duty enough for the task. I purchased enough of it for the length of the slide-out plus a little extra.Third was to cut the fabric. I found a place to lay it out and used a rotary cutter to cut the length I wanted and cut the width wide enough to allow for both the rope to be sewn in and to allow for a double-folded seam on the outer edge, wide enough for grommets to be installed plus a little extra. It was good that I did, as I later needed that extra space.The fabric was cut and the rope sewn in to the distance between the rain gutter ends. The cut allowed the installation, but extra fabric was left for folding the side seams. It turns out I had left a little too much, so I later had to undo some stitching and re-cut and re-fold one end to get the length right.After installing grommets, I used rope and bungee cords to attach the cover to the slide-out. Initally, the outer edge was not stiff enough. I solved that by getting some fiberglass marker poles and copper tubing. The poles were cut so that end-to-end, they are a little wider than the cover. The copper tube was cut and glued to the middle segment on both ends. The two outer pieces slide into the other end of the tube to make one long, strong, flexible pole that fits in the folded fabric with the grommets. Now for a couple of pictures. 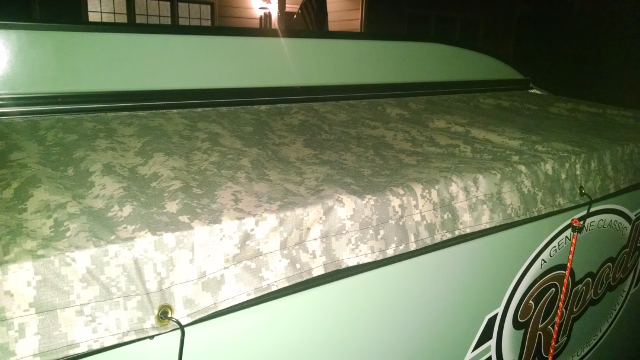 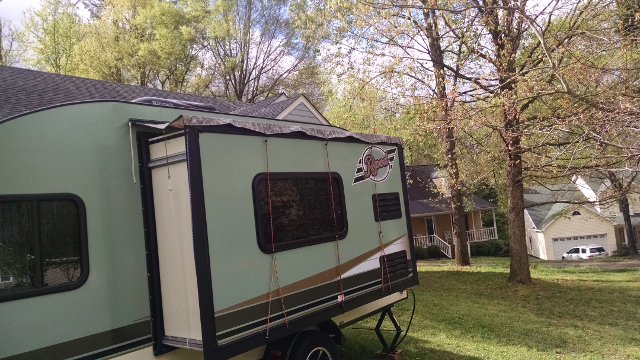 The fiberglass pole was added after this picture was taken. I will have to get a good shot of it to post later. I also realized with this short a slide-out, the bungee cords and rope on the two ends was not needed, as this isn't wide enough for wind to be a problem.Edit: Here is a shot with the poles inserted. The poles are 3 solid fiberglass marking stakes like those used for driveways, etc. I got them at Lowes. The end two are full-length. The center one is cut to a suitable length. Copper tubing is glued to both ends of the center rod. The two end rods slide into this ferrule to make one longer stiff rod which was fed through an opening in each end. It really makes a difference, keeping the cover tight and allowing any water to drain better. The fiberglass pole was added after this picture was taken. I will have to get a good shot of it to post later. I also realized with this short a slide-out, the bungee cords and rope on the two ends was not needed, as this isn't wide enough for wind to be a problem.Edit: Here is a shot with the poles inserted. The poles are 3 solid fiberglass marking stakes like those used for driveways, etc. I got them at Lowes. The end two are full-length. The center one is cut to a suitable length. Copper tubing is glued to both ends of the center rod. The two end rods slide into this ferrule to make one longer stiff rod which was fed through an opening in each end. It really makes a difference, keeping the cover tight and allowing any water to drain better.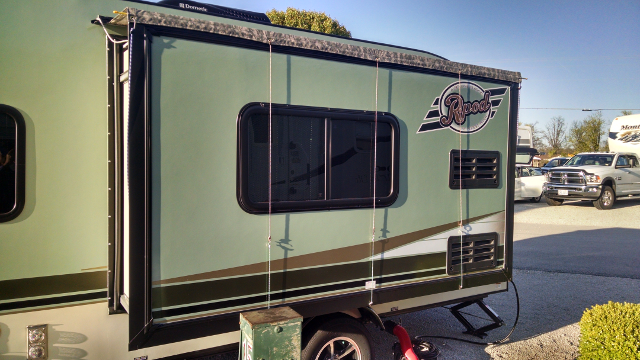
|
How do you attach it to the pod above the slide-out? Could you take a close-up picture of this area?
Thanks